Installing R and RStudio
In this lecture, we will learn how to install R and RStudio on your computer. We will cover the installation process for both Windows and Mac. By the end of this lecture, you will have R and RStudio up and running, ready for data analysis and statistical computing.
Note: Installing R and RStudio is straightforward. Follow the steps below, and if you encounter any difficulties, refer to the provided links or seek help from the community.
Downloading R
Step 1: Visit the CRAN Website
Go to the CRAN website to download the latest version of R. CRAN (The Comprehensive R Archive Network) is the official repository for R software and packages.
Step 2: Choose Your Operating System
Select your operating system (Windows, Mac, or Linux) to download the appropriate installer.
- Windows: Click on “Download R for Windows” and then “base.” Download the installer and run it.
- Mac: Click on “Download R for (Mac) OS X” and download the appropriate installer for your version of macOS.
Step 3: Install R
Run the downloaded installer and follow the on-screen instructions to complete the installation.
- Windows: Double-click the installer and follow the prompts, clicking “Next” until the installation is complete.
- Mac: Open the downloaded
.pkgfile and follow the installation instructions.
::: {.callout-note} ::: {.callout-note} If you need detailed instructions, refer to the official R documentation or this helpful installation guide. (Although second one is in Korean, you can right-click on the webpage body and use the translation menu.)
:::
Downloading and Installing RStudio
Step 1: Visit the RStudio Website
Go to the RStudio website to download the free version of RStudio Desktop.
Step 2: Choose Your Operating System
Select your operating system (Windows, Mac, or Linux) to download the appropriate installer.
- Windows: Click on “Download RStudio for Windows” and download the installer.
- Mac: Click on “Download RStudio for Mac” and download the installer.
Step 3: Install RStudio
Run the downloaded installer and follow the on-screen instructions to complete the installation.
- Windows: Double-click the installer and follow the prompts, clicking “Next” until the installation is complete.
- Mac: Open the downloaded
.dmgfile, drag the RStudio icon to the Applications folder, and follow any additional prompts.
Verifying Your Installation
Once you have installed both R and RStudio, verify the installation by opening RStudio:
Launch RStudio:
- On Windows, find RStudio in the Start menu and click to open.
- On Mac, find RStudio in the Applications folder and double-click to open.
Check the Console:
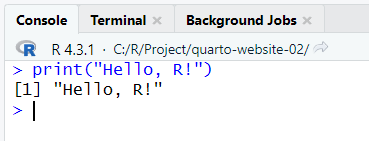
- The Console pane should display the R version information, confirming that R is properly installed.
R version 4.x.x (YYYY-MM-DD) -- "Nickname"Run a Simple Command:
- Type the following command in the Console and press
Enterto ensure R is functioning correctly:
print("Hello, R!")- You should see the output
Hello, R!in the Console.
- Type the following command in the Console and press

Troubleshooting
If you encounter any issues during the installation, consider the following resources:
- RStudio Support: Visit the RStudio Support page for common troubleshooting steps and FAQs.
- R Community: Join forums like RStudio Community or Stack Overflow to ask questions and seek help from other R users.
Conclusion
Congratulations! You have successfully installed R and RStudio on your computer. You are now ready to start writing and running R code. In the next lecture, we will explore the basic syntax of R and write our first R scripts.
Stay tuned for more exciting content in the R Basics series!
Keywords: Installing R, Installing RStudio, R installation guide, RStudio installation guide, R tutorial for beginners, how to install R, how to install RStudio